
 English
 Spanish
 German
 French
HOW TO FIX LED LIGHTS
LED lights are widely used to decorate indoor and outdoor spaces,what would you do when LED light is broken?
Most people may choose to replace it with a new one,but in fact, repairing light bulbs is not as complicated as everyone thinks.
Don’t throw away the light if it’s broken,follow our guide ,it can be repaired in just two minutes.
TEST BEFORE FIXING
You have to do a small test to find the reason why the light is not on.
Reason 1: Light bulb problem
Take a working light bulb from another room and change it to see if it lights up. If it doesn't work then you can rule out a problem with the bulb. If it turns on and off, it may be that the lamp holder (which is the interface between the bulb and the wire, generally divided into screw and socket) is short-circuited.
Reason 2: Switch problem
First of all, remember to cut off the circuit first, turn off the main switch, and then buy a new switch, and follow the instructions above to connect the live and neutral wires.
Reason 3:Broken wire
This probability is very low, but it does not rule out the possibility that the wire will be broken by ordering a nail or something during the decoration process. If this kind of problem occurs, find a dedicated electrician to help you solve it.
Reason 4:Power cut
Wait patiently.
TRY TO FIX
If the last three reasons are eliminated through the above test, you can start repairing the lamp according to our steps.
STEP 1
Open the lampshade,insert the lampshade and the lamp body at the junction of the lampshade and the lamp body with a test pencil.

STEP 2
When you open the lampshade, you can clearly see the burnt LED lamp beads. Commonly burned lamp beads will have "small black spots". If there are no small black spots on the light source, the driver is mostly damaged and you need to replace the matching driver power supply.

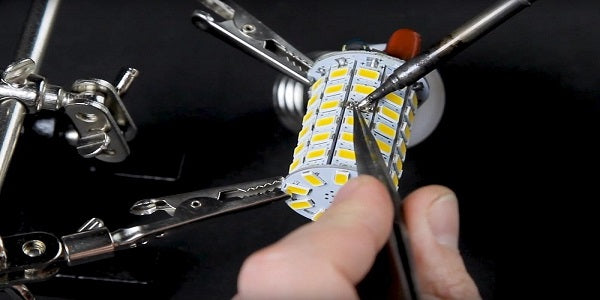
STEP 3
Use long nosed pliers to cut off the burnt lamp beads. Please be careful not to scratch off the circuit on the aluminum substrate. Cut the lamp beads so as not to damage the aluminum substrate.

STEP 4
Use an electric soldering iron to connect the attachment of the original lamp bead with the excess solder joints to achieve a path.

STEP 5
Use an adaptive voltage LED tester for testing. If you don't have this tool, please ignore this step.

STEP 6
Restore the bulb and check the effect. If there is no abnormality, the repair is successful, and there will be no dark spots with one less lamp bead.

This method is suitable for most LED lamps, the principle is the same.
If you want to choose a best lamp for your bedroom, you can refer to this " 5 TYPES OF LIGHTS BEST FOR BEDROOM" post to get the answer.
